A better way to do visual regression testing
December 21, 2016
Table of Contents
The concept of visual regression testing isn’t new, but it’s been in the spotlight lately. There are two factors causing this growth of attention.
- First, the advent of rich UIs and responsive design has made it next to impossible to efficiently test web applications and websites without focusing on CSS and visual layouts.
- Second, the ever-increasing competition among internet businesses forces companies to search for faster ways to create and run automated software tests.
So how do you guard your web application against visual bugs? Choosing the right visual regression testing strategy is important, considering that each of these strategies has its pitfalls. Namely, there’s an overwhelming number of companies that never automate visual testing, which prompts questions.
So can manual testing really do the job?
Given the inefficiency of visual test automation with Selenium, it’s easy to understand why even in 2017, developer teams still fall back on manual testing. But is it really a viable option? Isn’t it just too slow?
In reality, few software development teams can afford running visual regression testing manually after each UI revamp. Even though the time of manual testers is less expensive than that of automation engineers, relying on manual testing is a false economy.
What’s more, humans aren’t that good at spotting visual differences in the first place due a thing called
change blindness. If we don’t expect to see a minor change, we’re subconsciously bound to overlook it.
Now, the problem here is that tweaking the UI is all about unexpected changes, and CSS is to blame. Once you add a new class or CSS rule on one page, it will almost certainly override something on a completely different page. As a result, your users are more likely to spot the bug than your QA team.
How about automation? A quick look at commercial and open-source visual testing tools
The unpredictable nature of CSS bugs burdens test automation, too. It’s CSS that cuts the ground from under the feet of developers believing in the resilience of the “thin UI”
. Proponents of this approach take on the task of minimizing visual regressions meaning to lighten the logic layer in the UI. Obviously, CSS bugs constitute a blank spot in this approach.When it comes to dealing with CSS issues in testing, image comparison offers a seemingly more straightforward solution. There’s also a whole bunch of screenshot comparison tools and modules available for visual regression testing in Selenium or similar web testing frameworks. These tools enhance the ability of UI testing frameworks to spot visual regressions, so they’re definitely worth a look.
Visual regression testing with PhantomCSS or WebdriverCSS
PhantomCSS and WebdriverCSS are the default image comparison modules for, respectively, PhantomJS and Webdriver.io.
Tools of this kind automatically take UI screenshots and compare them to baseline images during regression testing. They also notify you of visual regressions by failing tests in case the layout is broken. In addition, some of these tools can black out UI regions, which is useful for dealing with timestamps, ads, avatar images, and other dynamic UI areas.
But can they really make for efficient visual regression testing tools? It depends on how much time and effort you’re ready to invest into UI testing.
As far as automated image comparison goes, popular code-based image comparison solutions don’t offer much in terms of ROI. Even though they spare you from having to eyeball each page in search of layout regressions, they also tend to over-complicate things that are supposed to be simple. There’s a case illustrating what I’m talking about.
About a year ago, 10up’s lead frontend developer John Bellah posted this neat guide to visual regression testing with PhantomCSS. The article itself is great, but what really caught my eye was the top comment:
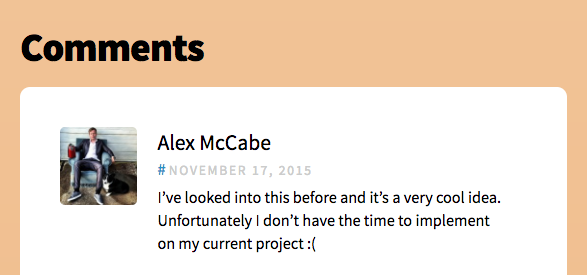
I bet anyone with experience of testing web UIs can relate. Sure, PhantomCSS enables you to automate visual UI tests, but the solution it offers is far too complicated to be something you can try out easily.
This solution makes you install multiple modules and setup complex testing environments, it requires coding, and in the end, it still produces brittle tests. Even though visual regression testing is important, there’s just too much overhead in trying to make PhantomCSS work the way it’s supposed to.
Of course, PhantomCSS and WebDriverCSS aren’t the only code-based tools out there that allow you to automate visual regression tests. The problem is other popular platforms aren’t making things easier. Take a look at Wraith, BackstopJS, or Gemini, and you’ll face the same exact issues. In fact, solid programming background might be even more critical with some of these.
Aside from that, the functionality offered by both PhantomCSS and WebdriverCSS pretty much comes down to basic screenshot comparison. True, there are things like blacking out dynamic regions and anti-aliasing for minimizing false positives — but that’s pretty much all there is. You still have to tinker with AJAX and locators, and you still end up rewriting dozens of tests whenever someone decides to change the UI.
So what does this all bring us to?
PhantomCSS and WebdriverCSS reflect the problems inherent in any code-based solution for visual regression testing. Whenever you work with a low-level tool, you end up teaching your computer to browse your website for you — instead of reproducing actual user actions. So wouldn’t it be better if your testing solution enabled you to do the latter?
Now, reproducing actual user actions is what record/playbacks tools do — but they’ve never managed to do it right because they fail to deliver anything but basic screen-capturing functionality. That is, they’ve never managed to do it right, until now.
Visual regression tests with Screenster
So is there a solution that actually works for CSS regression testing? We’ve asked ourselves the same exact question when automating UI tests for our product AjaxSwing. We’ve researched a dozen of existing tools, and we’ve arrived at the age-old conclusion: if you want to do it right, do it yourself.
Two years later, we’ve launched Screenster, our very own cloud-based platform. This platform builds on the user-friendliness of the record/playback testing tools, but expands their functionality with a slew of advanced features.
Here are our solutions to the widespread problems of visual regression testing that QA engineers and companies face on a daily basis.
Code-free tests = higher ROI
We get it, coding is fun. What’s not fun, though, is having to spend days scripting hundreds of UI tests that don’t produce any business value. What’s even less fun is rewriting half of these tests every time someone adds a new menu item or removes a field from the subscription form. Besides, having to code your tests means that you’ll need QAs with solid programming skills.
So what if you use a codeless tool for visual regression tests?
The immediate benefit is that your tests can be created by manual testers, or even product managers — and they’ll record these tests faster. We put Screenster to the test against Selenium and regardless of the differences in programming abilities, this approach provided 10 times the ROI based on the development time alone. This is actually the main reason why Screenster is code-free.
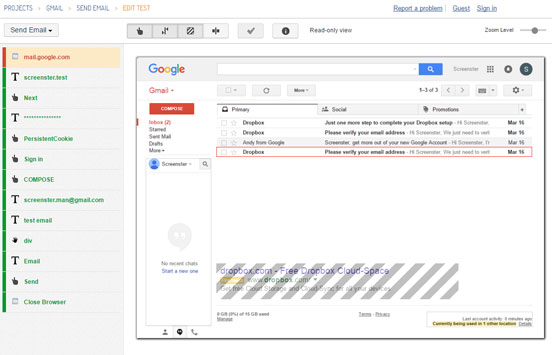
Screenster offers a streamlined visual regression testing service in a form of an integrated platform, complete with with embedded browsers and a web-based portal. It takes most of our clients no more than 20 minutes to master the core functionality, and under 5 minutes to record a basic test.
With Screenster, your team is instantly productive. Besides, our platform offers simple-to-follow reports for seeing the status of test suites and changes management. At the end of the day, clear reporting is paramount for maintainability and the time you spend updating your tests. Knowing how often the UI changes, we’ve made Screenster simple and flexible, so that you could respond to change fast, and with no hassle.
Visual Baseline with Smart Comparison and Smart Locators
When creating Screenster tests, you record a series of actual user actions. Every time a user interacts with the UI, Screenster captures a screenshot of the page along with its DOM.
The screenshots from the first test run become the Visual Baseline. Once you change your UI and start running visual regression testing, Screenster will compare new screenshots to the baseline. When comparing the two, the platform is smart enough to disable anti-aliasing to filter out insignificant differences caused by rendering. At the same time, it’ll detect layout issues, broken fonts, and unexpected color changes even if the difference comes down to a single pixel. Basically, we’re talking about here are visual/CSS regression testing suites with more precise tests and fewer false positives.
Thanks to a feature called Smart Locators, Screenster will also recognize individual elements and store their DOM parent trees, CSS classes and IDs for future access. This way, even if the DOM structure of a page changes, Screenster will still be able to target these elements.
Add to baseline and Ignore rules
If a particular change is intended, you can add it to the baseline with one mouse click. In case there are dynamic areas on the page, you can exclude them from future comparison by clicking on the Ignore button in the dashboard. That’s right, there is no need to search for individual tests or hand-code workarounds — the feature is part of the native functionality of the platform.
Content comparison
One thing that really makes Screenster stand out is its algorithm for processing on-page texts and image content. When recording a test, Screenster builds separate baselines for content, and it uses these baselines during regression testing.
There an important reason for why content comparison is essential for an efficient visual regression testing tool. While CSS is the primary cause of layout shifts, content changes constitute the second major factor that causes bugs of this sort.
In the case of manual UI testing, you can typically see which of the two — CSS or content — has caused the shift. If you automate the process with Selenium, you’ll have to spend additional time and investigate the reason behind the test failure. In case with Screenster, the platform will simply tell you whether it’s a CSS bug or new text or image that has caused your UI to look differently.
Bottom line
When working on Screenster, we’ve made a point of streamlining visual regression testing. To do this, we addressed everything that we considered problematic in other tools. We’ve prioritized simplicity and efficiency, and we’ve put a particular focus on test maintenance. Finally, we’ve made sure Screenster tests provide an exact representation of what users see and how they interact with the UI.
There’s a lot that can be said about the possible benefits of this solution. However, the only way to tell of Screenster suits your project is to try it yourself. Test our platform by running your visual regression tests and tell us what you think about.
Hah, a read that article on CSS tricks! Never used Phantom CSS in my life though…
This actually does look like a better way to do visual regression testing. Out team has manual sessions scheduled before each release, and we’re planning to write e2e tests later on. Chances are your tool will work better than Protractor for that purprose. I’ve pinged you via your contact form
The problem with visual regression testing is that nobody does with regression testing. This is actually the first time I see this phrase used as a term and I’ve been working as a tester for two years
This looks like a tool that a QA outsourcing firm can use. You’re less expensive than UFT or TestComplete, and you also automate manual UI testing. I used to work as a manual tester in outsourcing and I could’ve used a visual regression testing tool like this one
Speaking of the comment you’re quoting here, I can feel Alex’s pain. people got too much work on their plate and setting up WebdriverCSS… noone got time for dat
I guess people would rather have visual regressions than spend time tinkering with WebdriverCSS
Visual regression testing !== image comparison, and that’s what that post of CSS tricks is missing. If you’re dealing with screenshot comparison, you’re not catching minor bugs that slip under the tolerance threshold. Here’s why. Say you have a 5% tolerance threshold, which s pretty common. No imagine you have a margin that’s 5px off to the left. If the div is small enough (e.g. it’s a navigation menu item), that’s well below 5%. Also, a menu item that’s off by 5px is something anyone would notice, and a it’s a pretty common CSS bug, too
There really are quite a few shortcomings of visual regression testing with selenium or selenium-like solutions, but I wouldn’t say that image comparison is the Holy Grail. Pixel comparison has always sucked because either you’re getting false positives in 80% of tests or you miss important issues because your fault tolerance is damn too high.
The term “visual regression testing” is really a blurred one. How do you have visual testing without a person looking at the screen? I don’t have much faith in image comparison because I don’t believe in the overall idea behind the “pixel matching that allows for 2% differences”. If you have a broken margin /padding/border. that’ll be well below the 2% threshold. If you don’t have the 2% tolerance, all of your tests will fail because anti-aliasing. If you have, say, a 5% threshold, your tests will start to ignore missing buttons, dates, and userpicks…
Looking at separate components instead of the whole Screenshot is what makes for a good feature, as far as visual testing goes. If you look at how an individual component renders, you can have a script working with it should the UI change. In my current project, we’ve been changing the location sign-in/sing-up buttons each month for five month already.
I worked on several projects that used a visual testing setup of this sort, with Wraith and Gemini. In both cases, our frameworks were taking screenshots on test failure. So it image diff didn’t actually trigger a tests failure – it was the other way around
Why not take screenshots on the first and the last test? In most cases, if something breaks CSS, the visual bug will persist till the end of the user session (if you’re staying on the same URL, that is). I image running screenshot matching for each click is expensive in the currency of speed and processing power.
This content comparison thing you have is something that I wish more visual testing tools had. When testing a platfrom in production, you really have little knowledge of—or control over—content managers, marketers, and other people constantly changing the content of the website. So either you don’t take screenshots at all or get failed tests for a working UI because someone added a come somewhere