Selenium waits: isn’t it time to move on?
August 29, 2017
Table of Contents
How do you make Selenium WebDriver wait for page to load.
There’s an important difference between a human tester and an automated UI testing tool. This difference comes down to patience: humans are capable of it, and machines aren’t. When processing a test, an automation tool expects to obtain some result, like a button click. If the button is missing, the test fails, which is what we pretty much expect from it If the button takes too long to load, though, the test will also fail, which is certainly not the result we’re counting on.
False positives of this sort are the reason why timeouts exist. With timeouts, we can instruct an automated UI testing tool to “wait” for several seconds before trying to click on the button.
This, however, introduces new difficulties. Suites of automated tests are typically synchronized with each other.
Let’s say there’s a test called A1, and a test called A2 which depends on A1. If running A1 now takes 2x more time, A2 will fail because its pre-conditions are not met. Therefore, A2 requires adding timeouts as well. Naturally, a change to A2 will affect an A3 down the chain, and so on. Having to keep track of all of this is one of the reasons why UI test automation is so difficult.
Another issue is that timeouts increase the time needed for a testing suite to run. While this doesn’t seem like much of an issue at first sight, we’re talking about hours-long delays. Have you ever been in a project where you start a test in the evening and inspect the results in the morning next day?
The problem with the increased running time drives us to a simple conclusion: ideally, waiting should be flexible. If an element is present, no need in additional timeouts. In fact, let’s see how we can add timeouts to ensure meeting expected conditions. Selenium will serve us as an excellent example.
Implicit and Explicit Waits in Selenium
Selenium offers us two options for solving the problem. The first one is to add a predefined wait command before a test step where an element in question will appear. As for the second option, we can use a conditional wait command. This command will pause the test until the element in question is available OR until a predefined maximum limit of waiting time is reached. The former option implies using an Implicit Wait while the latter one is an Explicit Wait.
Implicit Waits
The Implicit Wait command has just two parameters: waiting time and time unit (e.g. seconds, minutes, hours). You have to put it before the step where your test is checking for the availability of the element:
In the code above, you need to replace T1 with the amount of seconds you need to wait. If you want to wait for minutes (or hours, why not), then specify it with the help of the second parameter: put TimeUnit.MINUTES (or TimeUnit.HOURS) there.
Explicit Waits
In order to use the Explicit Wait command, you need to specify the time limit at the beginning of the test. Add the wait command before taking an action on the element you’re targeting:
To make the command work, replace “…” with conditions also defined at the beginning. The list of conditions is limited however. You can find more details following the link to SeleniumHQ.
What is good and what is annoying about Selenium waits
Selenium waits provide testers with the flexibility needed to cope with different complicated scenarios. This makes Selenium waits a must-know tactic for every professional tester.
There is, however, one problem with Selenium waits: like any hand-coded test scripts, they require much time and effort.. Each time a problem with element availability arises, you have to browse through scores of tests involving this element. In addition, you need to define parameters within each test and add wait commands whenever appropriate. Of course, you could just bluntly add a timeout command for each element that is to be clicked, pressed, etc. But imagine how much extra time this will add to the overall running time of your tests.
Once all tests are ready, the tester will have to maintain all this lot which involves reacting to each and every change of application behavior. A typical example: an icon (which you have to click in order to proceed) has been taking a couple of seconds to load before; now (after another update) it loads instantly but remains disabled for the same amount of time. As a result, you will have to change the condition of your explicit wait before clicking on the icon. Now what if there is a dozen of such icons?
The strong need for faster maintenance has caused the growing interest in Selenium alternatives for testing automation. Let us explore alternative ways to organize waits in automated tests.
An alternative way: easy timeout management with a codeless UI test automation tool.
Screenster’s mission is to drastically simplify the process of test maintenance, which is why it avoids making testers hand-code tests. The solution it offers to the problem of slowly loading elements is quite simple: each test step has a timeout by default, and each timeout defines a maximum waiting time. If an element is available from the start, Screenster proceeds to the next step instantly. You don’t have to define any parameters except of an integer value which determines the amount of seconds to wait for.
With Screenster, you don’t have to manually define timeouts when recording a test. At each step, Screenster checks how much time you have been waiting before clicking on a link or pushing a button. This exact amount of time will automatically become the timeout for the next step. Given that the application behavior is stable, there will be enough time to repeat this operation during test replay. Otherwise if some step returns a failure, you just need to edit the failed step and increase if timeout is needed — no other steps will be affected by this change. All it takes to modify a step and make your test function properly is a few seconds of your time.
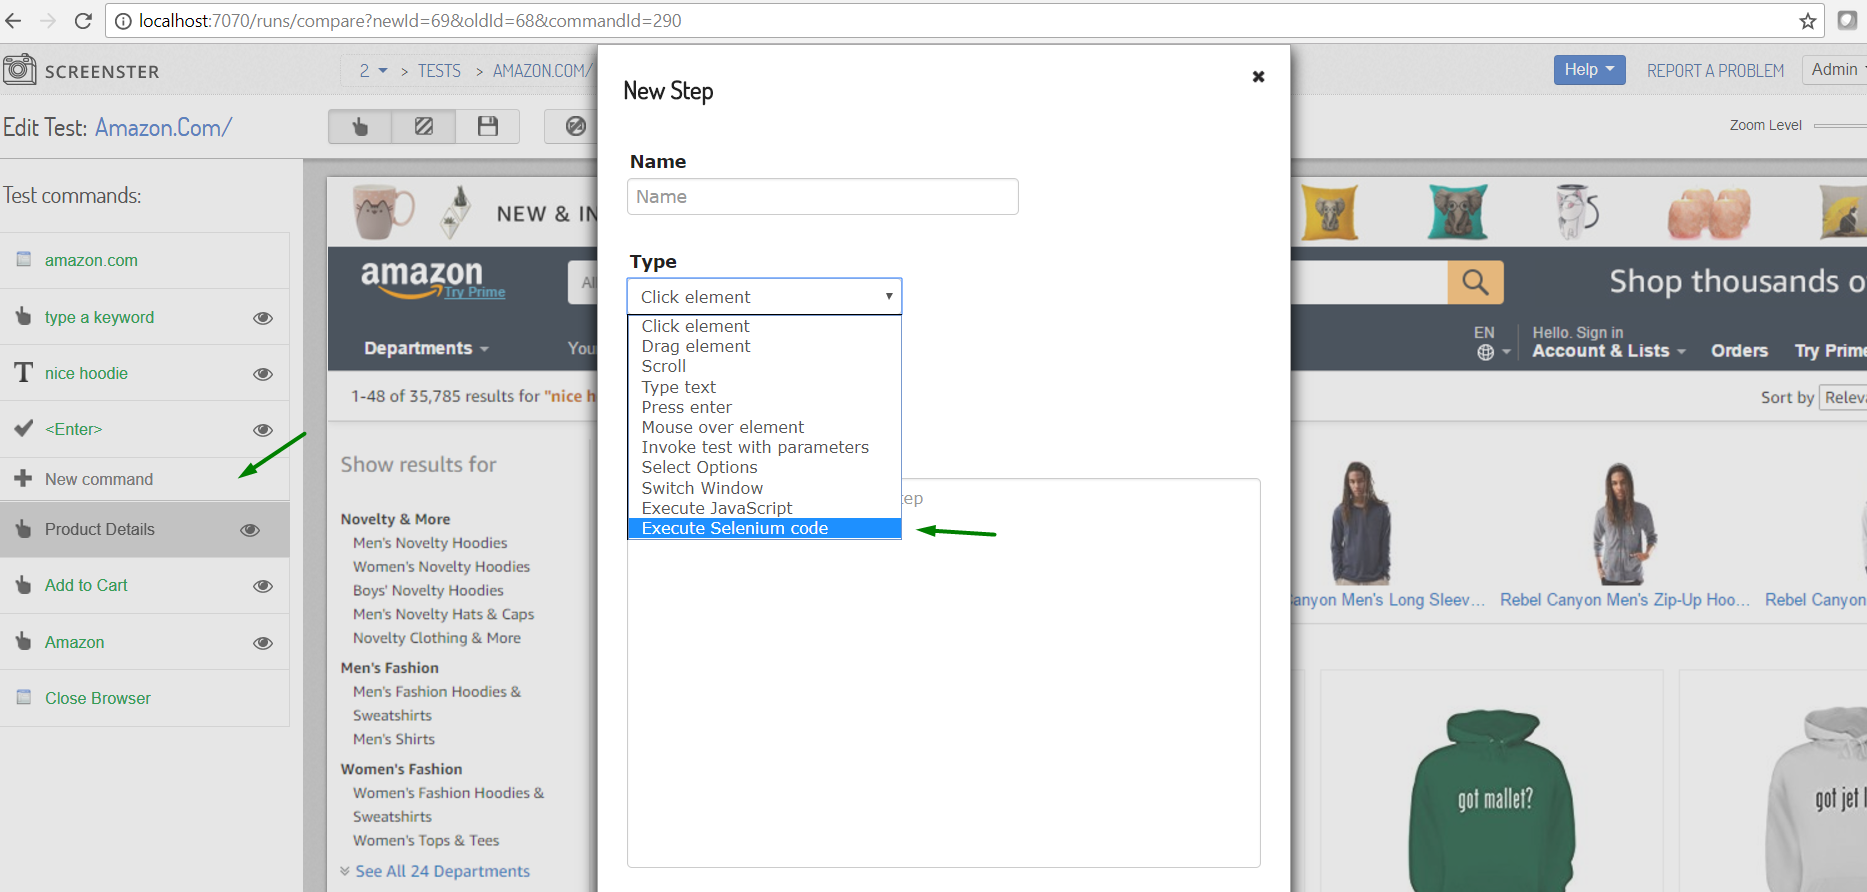
Finally, there is a bonus option for Selenium fans. It is possible to add some executable Selenium code before a selected step of a Screenster test. To do so, open the test in Edit mode, select the necessary step and click on the ‘+’ icon on it (the icon is shown on mouse hover). In the popup which opens, select the ‘Execute Selenium Code’ option, and go ahead!