How to use test parameters? Automated UI testing with Screenster
October 24, 2017
Table of Contents
Test parameters are an age-old issue with well-known solutions. Use variables for the values that you know will change. For each variable, remember that the parameter name you’ve chosen must be meaningful. Follow these two rules, and you’re in a good shape. Seems simple so far, right?
As long as we’re talking about one hand-coded test, this approach does look simple and good. It boosts the reusability of your coded test, which is always nice. By adding test parameters you also make your code more robust and maintainable.
I wish this method of automated testing looked just as good and simple in real life, but it doesn’t. Try writing a hundred test cases for end-to-end UI testing, and you’ll see what I’m talking about. Basically, my problem with this method is not about test parameters but, rather, the whole idea of hand-coding hundreds of test cases for the UI.
At the end of the day, handwritten tests are just too low-level and unproductive. You have to decide what to take in as your test parameters and use them across all test suites. Not a big deal, but requires a lot of upfront thinking. Whenever you add a new test parameter mid-project, you have also to revise older test scripts and rewrite some of them.
Test parameters are awesome, but code-based UI tests aren’t
Hand-coding your tests is okay for software testing on lower levels, but this approach simply doesn’t work for the functional test automation of the UI.
So maybe, your test automation strategy needs to move away from hand-coding? True, most Selenium fans will scowl at the very idea of working with a codeless test automation tool or an IDE that uses record-playback. But if you are the sort of a tester who aims for productivity, a codeless automation testing tool might actually prove a better solution.
UI testing with Screenster: a record-playback automation testing platform that supports test parameters
It’s 2017, and there’s a whole bunch of smart platforms for codeless functional testing of the UI. As far as test automation goes, Screenster has one particular feature which many platforms of the same type are missing. Yes, I’m talking about test parameters. Lets see how this feature works.
The platform automatically captures all user input when recording a UI test, and offers to save it as editable test parameters for future use.
The magic of Screenster comes in play when the same values are entered during recording of future tests. When a match is found to an existing parameter, Screenster automatically substitutes the entered value with the parameter. As a result, you get maintainable tests without even thinking about it.
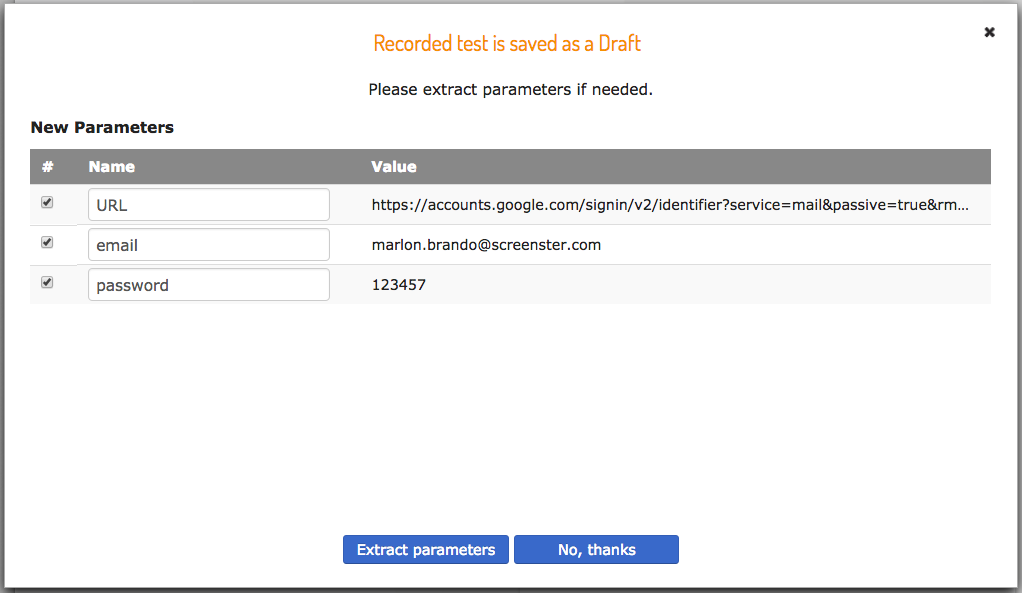
In the screenshot above, Screenster has captured the base URL and user credentials from a Gmail login session. The parameter for the base URL will prove useful should you run the same UX scenario on a local server. In the meantime, user input parameters will help you when testing the same UX routine against a set of different user credentials.
Having an editable test parameter for user input is handy for any website or web app that uses a search bar. How many lines of code will it take to test the search results for related queries in an online product catalogue? In the case of Screenster, we’re talking about one simple test you can automate in under five minutes.
There are other useful features as well
Of course, it’s not just test parameters that give Screenster a competitive edge over other platforms. Here are a couple of other features that the platform offers.
Self-healing locators
Every automated test that deals with user input has to target separate fields inside of a form. In case with Selenium locators, this would often involve parent-child CSS selectors which are inherently brittle. In case with Screenster, you won’t have to worry about selectors at all.
When recording a test, Screenster verifies everything on a web page. For every UI element, it captures the complete list of DOM ancestors and descendants, as well as IDs, classes, names, and other attributes. The platform than builds a complete list of locators for every element and swaps these locators if some of them got broken.
Smart visual comparison with visual baselines
No UI test is complete without image comparison. Now, isn’t it just weird that neither Selenium nor other major code-based frameworks offer a reliable default mechanism for image comparison? The best you get is a simplistic comparison module that takes hours to set up.
Screenster ships with two visual comparison modes available out of the box. The platform offers smart functionality for working with dynamic UI regions, and its algorithm minimizes false positives caused be image rendering.
Automatic handling of timeouts
Handling user input means communication with a server, and communication with a server can cause timeouts. If you hand-code your UI tests, you know this involves WebDriver waits or a similar mechanism. While the latter aren’t that difficult, any sane tester would rather not deal with them. And that’s another benefit that you get with Screenster.
Instead of making you hand-code explicit and implicit waits, the platform automatically determines optimal waiting time for each element. Yet again, this turns a whole class of false positives into a non-issue.
Would you hand-code your tests if you didn’t have to?
Not having to hand-code your tests saves you weeks of time, but there are benefits as well. Visual testing is one important example. Very few Selenium teams build automation tests for visual comparison of the UI versions simply because the existing solutions to messy. With smart IDEs like Screenster, visual testing is a core feature.
Imagine that instead of automating happy paths and leaving the greater part of UI uncovered, you could verify every element on a page. That’s exactly what Screenster offers.
Care to learn more?
Screenster combines the simplicity of record-playback with UI verification and smart features like parameters, automatic selectors, selectors, and out-of-the-box visual verification. These features allow for a more comprehensive functionality which is fully accessible to non-programmers.
Moreover, the core feature set is so simple any non-technical user can pick it up in under 15 minutes. Care to learn if Screenster can live up to this claim? Try our Demo and see it for yourself:)