Selenium IDE for Chrome
September 26, 2018
Table of Contents
What is Selenium IDE?
Ever noticed how some companies literally call their products Selenium IDE in Chrome? Katalon and Kantu are two examples, but I’m sure you’ve seen more. If you are new to UI testing automation and this seems confusing, Selenium IDE has nothing to do with these.
Rather, Selenium IDE is a standalone Firefox extension for record-playback testing of web UIs. This tool allows testers to record interactions with a UI and automatically rerun them during regression testing.
Selenium IDE has gone through several iterations, and the product nearly died in 2017 when Firefox switched to a wholly new extensions format. Luckily, there are teams of developers rebuilding Selenium IDe for both the new versions of Firefox and Google Chrome.
Okay, so what is the deal with Selenium IDE in Chrome?
Running Selenium IDE in Chrome has long been a much-desired functionality for many of us. Chrome is the world’s most popular browser after all. So how come the recent launch of the standalone plugin that runs Selenium IDE in Chrome failed to make waves?
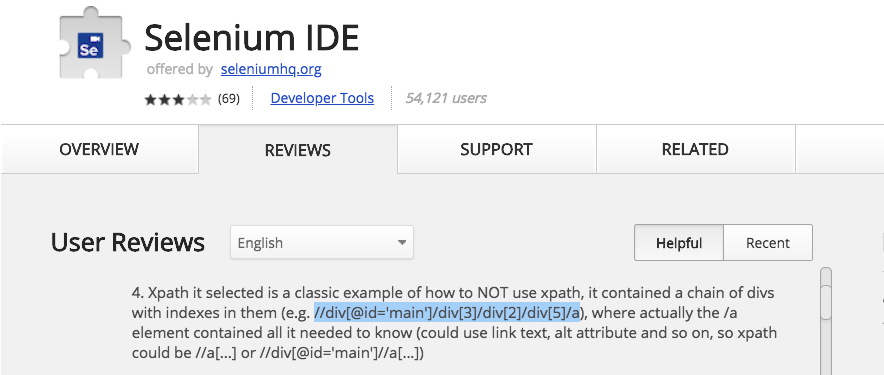
Stating the obvious, the Chrome IDE is still undergoing an “experimental stage”. It still lacks wait functions, produces inconsistent XPath/CSS selectors, and sometimes ignores keyboard input. Besides, users criticize it for incorporating bad XPath practices:
So basically, the question is whether this plugin will improve fast enough to meet the users’ expectations. But is this a realistic expectation? The original Selenium Recorder, built for Selenium RC, was basically a one-man initiative. As for versions 2.x, so few people backed them that the development of Selenium IDE for Firefox 55 became a matter in question.
The sad truth is, this situation didn’t improve in 2018. Today, the modern Firefox recorder looks as half-baked as the Chrome version.
What this means, for now, is that you’d hardly want Selenium IDE in a production environment. But what if you just need to tinker with the recorder? There is a workaround for using it without having to wait for the Selenium IDE team to roll out more stable functionality.
Running old versions of the IDE with WebDriver Playback and Selenium ChromeDriver
Note that this is something of a “there, I fixed it” solution that is in NO way suitable for production purposes. You probably heard that older versions of Selenium IDE only worked in Firefox. Actually, this is not 100% true. There’s a neat little feature called WebDriver Playback that lets you run Selenium IDE in Chrome. Here’s a step-by-step guide on how to use Selenium IDE with it:
- Follow this link for a Selenium IDE download.
- Install and setup an older version of Firefox (specifically, Firefox 54.0.1 or Firefox Portable 54.0.1.
- Launch Selenium IDE.
- Go to ‘Options’ and select “Options…” in the drop-down menu.
- In the Options menu, select the “WebDriver” tab.
- Check the “Enable WebDriver playback” checkbox.
- Find the “Browser choices” input field right below the checkbox. Below the input field, you will see browser options. These include “android, chrome, firefox, htmlunit, internet explorer, iPhone, iPad”.
- Substitute “firefox” with “chrome”. Note that both variants are lowercase.
- Download the Selenium standalone JAR file and ChromeDriver. Add both files to the same folder on your local computer.
- Use Terminal to navigate to the folder with the downloaded files.
- Start Selenium server and ChromeDriver server via Terminal:
- Open Selenium IDE and run the test script. Note that the script will run in one of the more or less recent versions of Chrome.
If you wanted to find out how to run Selenium tests in Chrome, this is the best workaround for now. Follow the steps mentioned above and enjoy the new feature:). Being able to push Selenium IDE outside of Firefox seems like a great thing, provided that its functionality is good enough for you.
If you’re looking for a game changer solution though, there’s an awesome alternative.
Visual regression testing on the cloud with Screenster
Screenster is a smarter, cloud-based alternative to using Selenium IDE with Google Chrome. This new QA automation platform caters to non-developers and enables them to run visual regression test suites. Just like Selenium IDE, it uses record-playback to automate UI testing. Unlike Selenium IDE, it goes far beyond basic UI testing functionality.
Below you will find a short list of the features that Screenster offers.
Record-playback with smart comparison
Similarly to Selenium IDE, Screenster records actual interactions with the UI. It also captures screenshots of every page and UI state along with its DOM structure. The platform stores this information as a Baseline for future comparison during regression testing.
When comparing UI screenshots, Screenster detects visual issues of different kinds. It notices broken layouts, wrong font or colors, and other UI bugs. What’s more, the platform detects bugs of this kind with one-pixel precision.
Automatic verification of every on-page element
Screenster is one of the many alternatives to running Selenium IDE in Chrome. At the same time, it’s one of the few visual testing platforms that actually verifies the UI.
When running tests, Screenster automatically verifies the DOM, visual representation, and content of every individual UI element. This approach is more advanced, and far more effective compared to what that most other tools use.
Low-level solutions like Selenium make you hand-code UI verification scripts targeting separate elements. Visual platforms like Ghost Inspector simplify the process by asking you to click on an element to verify it. Screenster does this automatically.
Efficient visual testing
Most visual testing tools rely on pixel matching, with tolerance for minor mismatches set to reduce false positives. So, say, if 5% of pixels are different in the new screenshot, the test will still pass. The problem is minor bugs, like missing icons, added or removed content, or broken margin and padding, will slip under the 5% threshold.
A more efficient approach is to keep the comparison pixel-perfect for each individual element. If there are no bugs on the element level, the tool will run a quick page-level comparison to check the placement of elements. That’s exactly how Screenster tests works.
Smooth learning curve
Screenster is super-friendly to non-technical people, so you don’t need to be a programmer to use it. Here are two reasons why this matters:
- Web development teams rarely have the time or budget to cover every UI element with scripted tests. With tools like Screenster, teams can perform end-to-end UI regression testing by automating the job of manual QAs. In fact, even business staff can use Screenster to participate in UI testing.
- Even for developers, code-based solutions like Selenium or PhantomJS have a steep learning curve. Everyone knows it’s wiser to spend the time of developers on writing features, not tests.
Codeless test editing
Selenium IDE leaves you fumbling through generated WebDriver code whenever you try to modify a test suite. With Screenster, most of the test-editing functionality is codeless. You’ll be 10x more productive when creating tests, removing or adding new steps, or working with individual UI elements. With Screenster, you can automate a short UI test in less than 3 minutes:
Support for custom Selenium and JavaScript
What if you want to use your existing Selenium tests with Screenster? Or maybe, you feel that a particular case requires a handwritten, rather than recorded test…
We’ve got you covered in both cases. Selenium and JavaScript are first-class citizen in the Screenster infrastructure. If you need to, you can integrate custom-written Selenium and JS tests into your suites or expand recorded tests with code.
Automated everything
Part of the Screenster’s awesome factor is that it automates 99% of the processes that normally require tinkering. Ever had to hand-code timeouts or ponder how to build an element locator that won’t become useless after a new UI update? With Screenster, you won’t have to worry about things of this sort. The range of automated features includes:
- Timeouts. Automatic handling of timeouts takes the pain away from working with Ajax updates. At the end of the day, this streamlines UI testing of single-page applications.
- Locators. Screenster automatically builds precise, robust locators for each UI element. The platform updates these locators whenever someone changes the UI.
- Identification of dynamic regions. When analyzing a new test suite for the first time, Screenster will identify regions with dynamic content. It will mark these regions and offer you to ignore them during regression testing.
No browser extensions needed
Browser extension formats are a weak spot of both Selenium IDE and it’s modern alternatives (e.g. Katalon Automation Recorder). When Mozilla moved from .xpi to Web Extensions, it nearly killed Selenium IDE. Google move from the Chrome apps format lead developers like Postman to move their apps to desktop. What this tells us, is that browser add-ons aren’t that future-proof.
Unlike other cloud-based platforms, the core functionality of Screenster doesn’t rely on the installation of extra software. No Chrome of Firefox extensions, plugins or add-ons. Just log into your account and begin recording.
Collaboration features
Screenster works on a shared server that runs on the cloud or on premise. The platform enables QA teams to collaborate on tests suits by accessing a shared web portal.
CI support
Screenster supports major CI tools including Jenkins, Bamboo, TeamCity, and Travis via a CI plugin. The CI functionality of Screenster doesn’t require additional frameworks or components. The only thing that you’ll have to do manually is choose the CI tool in the settings menu.
Bottom Line: check out the alternatives to Selenium IDE
Sure, Selenium IDE is a neat, and might turn into a professional-grade solution once the new Chrome and Firefox versions become more stable. In the meantime, there are quite a few alternatives that offer useful functionality on top of record-playback.
If a simple tool for visual regression testing is what you’re looking for, cloud based platforms are a way to go. And even though Screenster isn’t the only tool of its kind, it’s definitely worth a shot.