Image and screenshot comparison tools for UI testing
September 12, 2018
Table of Contents
There is a simple case for why end-to-end UI testing is impossible without automated image comparison. Absence of a screenshot comparison tool puts your product at risk of shipping with visual bugs which rarely go unnoticed by users. No sane QA engineer is willing to accept that risk.
So do you automate image comparison when testing UIs? And if yes, what automation tool do you use? Is it a simple module for WebDriver (or other code-based solution) or a dedicated visual CSS regression testing tool?
Let’s look at the popular tools and platforms that QAs leverage to compare screenshots when testing web UIs.
In this post, we’ll find out if the functionality of these image comparison tools meets the real-life requirements of UI testing.
Resemble.js (underlies other image comparison tools)

Resemble.js is as an image comparison module that PhantomCSS uses to compare screenshots taken by CasperJS. Aside from this, Resemble.js can function as part of any image analysis setup. In fact, it serves as a core of other screenshot comparison tools on this list. The module offers basic image comparison functionality and a clean syntax:
There’s one issue with Resemble, though. The tool uses a somewhat simplistic pixel matching algorithm that allows for tolerance of the number of different pixels. This is not practical for comparing screenshots of web pages where content will often shift by just a few pixels resulting in image comparison fails.
Pros:
- Simple API for image comparison with JavaScript and HTML5 Canvas
- Flexible image diffing. You can ignore colors, anti-aliasing, and transparency effects (i.e. alpha), as well as
- customize the output of diffing (e.g. diff colors).
- With bounding boxes, you can run comparison for separate parts (i.e. regions) of the images.
- Resemble.js can ignore image regions during comparison.
Cons:
- The image comparison functionality of this tool boils down to simple pixel matching (i.e. checking for RGB pixel differences). This is suboptimal for real-life visual UI testing.
PhantomCSS

[UPDATE]: the developers of this image comparison tool have ceased maintaining it due to the introduction of the headless Chrome.
PhantomCSS is a screenshot comparison module that works in tandem with Resemble.js and offers a visual/CSS regression testing library for PhantomJS and SlimerJS. Both PhantomCSS and Resemble.js are brainchildren of Huddle, and both of them have a solid developer support and top-notch documentation
The drawback of PhantomCSS is it’s overhead-to-value ratio. Since the tool is not for a real browser that people use, your test results may differ from what the users actually see. On the other hand, the overhead of setting it up is comparable to that of a real browser. Due to this, there is little incentive to choose PhantomCSS for modern commercial projects.
Pros:
- Terrific documentation with best practices from Huddle.
- Works with Gecko.
Cons:
- Targets headless browsers.
- The setup takes quite a lot of time and resources.
- You can pixel-diff with Resemble.js directly in Node (e.g. in headless Chrome).
WebdriverCSS
[UPDATE]: WebdriverCSS is no longer maintained.
While PhantomCSS mainly targets headless browsers, there are quite a few solutions for automation screenshot comparison in real browsers. WebdriverCSS is one of these solutions. This image comparison tool is based on WebdriverIO, which makes for a lot of neat functionality. The tool allows you to write scripts in JavaScript, and it’s compatible with major TDD and BDD frameworks.
One more reason to like WebdriverCSS is the WebdriverCSS Adminpanel — a clean, nothing-extra-style dashboard with a slider for manual image comparison. Sure, setting up the admin panel adds overhead, but the overall experience of using the dashboard feels rewarding.
Pros:
- WebDriverCSS uses GraphicsMagick, which means it supports 88+ major image formats. This includes JPEG, JPEG-2000, PNG, GIF, PDF, TIFF, etc.
- Works on Windows, Mac, and Linux.
- Good documentation.
- Neat Admin Panel to make things visual.
- Can target or exclude separate regions of the image/screenshot. This includes, non-rectangular regions.
- Can ignore colors and antialiasing.
- Responsive testing: can test screenshots against an array of screen resolutions.
Cons:
- Isn’t yet compatible with WebdriverIO v3.0.
Puppeteer-screenshot-tester
Puppeteer is a rather popular Node library that drives Chrome (and Chromium) in both headless and full mode. One of the features available out of the box in Puppeteer is screenshot-taking with page.screenshot().
Launched in April 2018, puppeteer-screenshot-tester is a tiny, MIT-licensed npm package that extends this screenshot-taking functionality. This image comparison tool uses node-resemble-js under the hood. It allows for automatic comparison of full-page screenshots, adding decent screenshot comparison functionality to Puppeteer.
Pros:
- Can ignore regions (rectangles), colors, and anti-aliasing.
- Supports thresholds (e.g. test still passess if the differences are below 5%).
- Customizable errors.
- Works with Jasmine (and similar tools).
Cons:
- Takes time to master.
- Puppeteer targets JavaScript developers rather than QAs.
Wraith

Wraith is a Ruby-based tool for automated screenshot comparison. It uses ImageMagic for diffing, and works on Windows, Mac, and Linux. This tool is authored by the development team of BBC News, and it enables screenshot comparison in two distinct modes:
- Capture mode — screenshot comparison across two domains (e.g. test version versus live website).
- History mode — comparing screenshots across different versions of the UI on the same domain during regression testing.
Wraith is another solution that targets headless browsers. With that said, it works for Chrome (Selenium WebDriver with Chromedriver).
Pros:
- Can run several comparisons at once.
- Can crawl your website and/or domain.
- Test output includes image diffs (in a PNG format) and text files with test results.
- History mode for regression testing.
- Runs on CI (with Docker).
- Great documentation.
Cons:
- Targets headless browsers.
- The large feature set of Wraith takes time to learn.
Huxley

This image comparison tool is no longer maintained.
One cool thing about Huxley is that it adds record-playback on top of image comparison. The tool uses simple pixel matching and diffing, and it supports CI. Huxley will automatically notify you if there’s been a visual regression, and it will warn you in case you forgot to run your tests.
Another cool thing about this tool is that it was initially a project of Facebook and Instagram. As for the not-so-cool thing, Facebook dropped the support of this tool, even though Huxley’s code base is still available on GitHub for use or further development.
Pros:
- Supports record/playback (uses WebDriver to rerun actions).
- Overwrites screenshots if tests pass.
- Designed to be unopinionated.
Cons:
- The image diffing functionality of Huxley is rather simplistic.
Blink-Diff
The development team at Yahoo positions Blink-diff as a lightweight screenshot comparison tool. The solution enables testers to automate image comparison via the command line or by adding a BlinkDiff object to the project code.
Some of the notable features include cropping and block-out (i.e. ignoring particular UI regions). Besides, the tool breaks down image comparison automation into three distinct comparison modes:
- The Pixel-by-pixel mode detects all differences between the images.
- The Perceptual mode sorts out the differences that are less likely to be seen by humans.
- The Context mode detects missing and/or distorted parts of the image while accepting smaller differences.
This tools is MIT-licensed and available on NPM.
Pros:
- 40+ parameters to fine-tune screenshot comparison.
- Ignore regions (called Block-outs).
- You can apply filters before comparison (including grayscale, sepia, blur, etc).
- Image cropping.
Cons:
- Last updates to the Blink-diff codebase date back to 2016.
Pix-Diff

Pix-diff is a Protractor plugin that uses the image comparison module forked from Yahoo’s Blink-diff. It offers the same three modes of comparison (pixel-by-pixel, perceptual, and context), and it allows you to compare both whole images and separate image areas.
Pros:
- Works for whole-screen images and screen regions.
- Flexible comparison modes (pixel-by-pixel, perceptual, context).
Cons:
- Firefox support lags behind Chrome.
BackstopJS
BackstopJS is a config-driven CSS testing tool that includes image comparison as one of its core features. The tool enables QAs to test responsive layouts across multiple pre-specified viewport sizes, and it offers a wide array of reporting functionality. Backstop works with CasperJS, and it seems like a neat tool for web developers who don’t mind spending some extra time writing tests.
Pros:
- BackstopJS is more of a visual testing solution than a general-purpose screenshot comparison tool.
- Can target elements by CSS selectors.
- Has special utilities for SPAs and PWAs.
- Handles AJAX.
- Works with Puppeteer (as well as ChromyJS and SlimerJS).
- Supports JUnit reports.
- Customizable panel for visual inspection of differences.
- Integration with Docker.
Cons:
- Targets headless browsers (but the good news is it supports Chrome headless).
- Too developer-centric (hardly suitable for manual testers, requires learning for automation engineers).
Protractor-image-comparison

A lightweight plugin for Protractor, this tool enables testers to save and compare UI areas and full-scale screenshots on desktop and mobile. Protractor-image-comparison uses ResembleJS under the hood, has the concept of baselines, and it targets both mobile websites and hybrid apps on mobile.
Pros:
- Support for element screenshots in addition to whole-page screenshots, on desktop and mobile.
- Uses a concept of baseline screenshots.
- Allows to ignore image regions, colors, and/or anti-aliasing during comparison.
- Can hide scrollbars.
- Built-in utilities for testing on iOS and Android.
- Methods for flexible comparison modes (
.ignoreLess(),.ignoreNothing())
Cons:
- Testing for content changes is unreliable.
- Can fail to detect color changes in Chrome.
Needle

A neat option for the fans of Python, Needle offers image comparison functionality for Selenium. Aside from merely comparing visuals, Needle provides testers with tools for analysis of calculated CSS values.
Pros:
- Works with Selenium.
- Seems like a decent option is you must use Python.
Cons:
- This image comparison tool uses nose, a software that’s been in a maintenance mode for the past few years.
- The functionality of too limiting for professional (commercial) use.
CSS Critic
According to this tool’s developer Christoph Burgmer, CSS Critic is a “tiny framework that allows you to unit-test your CSS”. The tool does this by comparing the screenshot of the UI to a reference image. It doesn’t offer much aside from simplistic image comparison, though.
Besides the barebones functionality, there’s definitely a lot of room for improvement in the browser support department. As of today, CSS Critic is compatible with Firefox only.
Pros:
- Has a concept of basilines (reference images); allows to approve images to baselines.
- The output of CSS Critic is a simple web page.
Cons:
- Only works with Firefox.
Gemini (Yandex)

Gemini’s major claim to fame is the fact that it’s from Yandex, the company that has authored the BEM methodology of CSS development.
As far as more practical aspects go, Gemini creates an impression of a solid screenshot comparison tool. It works with Selenium and it supports every major browser (including IE8+).
Just like the more advanced image comparison tools on this list, Gemini is capable of testing separate areas of the web page. Besides, the tool is able to ignore inessential differences (like rendering artifacts) which minimizes false positives. Gemini also features a dashboard module that simplifies UI testing (even though this dashboard looks rather simplistic).
Pros:
- Supports Chrome, Firefox, EI (8+), and Opera.
- Allows to test separate UI elements (as separate regions in the screenshot).
- Works with SauceLabs and BrowserStack.
- Supports PhantomJS and ChromeDriver.
- Has both a CLI and a GUI.
- There are a couple dozen plugins that extend the functionality of this image comparison tool.
- Allows to set tolerance for anti-aliasing.
Cons:
- A large portion of open issues on Github are in Russian.
- The scope of things to learn is larger compared to other screenshot comparison tools.
Shoov
One great thing about Shoov is the slider-based dashboard that seems like a useful thing for manual examination of screenshot differences. When it comes to the automation testing, simple image comparison remains the tool’s core functionality.
Pros:
- Works for multiple browser/OS/device combinations.
- BrowserStack and SuaceLabs support.
- Has a good documentation.
- Neat GUI for a non-commercial tool.
- Good documentation.
Cons:
- Unnecessary complexities. For instance, the tool offer three methods for ignoring dynamic content.
Image comparison tools matrix
Let’s take another quick look at the screenshot and image comparison tools we’ve mentioned so far. Below, you can find a comparison matrix that sums up the basic features and benefits that these tools offer. We’ll exclude Resemble.JS from comparison because it’s essentially an image comparison module used by other tools (like PhantomCSS).
| Tools / Features | GUI / VIsual Dashboard | Browser type | Distinguishing features |
|---|---|---|---|
| Resemble.js | No | Real and headless | Low-level image comparison module used in other tools |
| PhantomCSS | No | Headless | Still is a solid option for SlimerJS. |
| WebdriverCSS | Yes | Real | Default option for WebDriver.io | Puppeteer-screenshot-tester | No | Real and headless | Lightweight library that adds image diffing to Puppeteer |
| Wraith | No | Headless* | Comparison across domains and product versions |
| Huxley | No | Real and headless | Webdriver-based record-playback with a built-in image comparison tool |
| Blink-Diff | No | Real and headless | Three comparison modes: pixel-perfect, perceptual, context |
| Pix-diff | No | Real and headless | Blink-Diff-based screenshot comparison tool for Protractor |
| BackstopJS | No | Headless | Smart timeouts for Progressive apps, SPAs and AJAX content |
| Protractor-image-comparison | No | Real and headless | Good Appium support |
| Needle | No | Real and headless | Python-based tools for image comparison (can use the PIL engine, ImageMagick, or PerceptualDiff) |
| CSS-critic | No | Real and headless | Image comparison-based “unit testing for CSS” |
| Gemini | Yes | Real and headless | Good cross-browser functionality, lots of plugins |
| Shoov | Yes | Real and headless | Drupal-friendly |
*Technically speaking, you can add real browser support to Wraith, but you’ll have to use an outdated module.

When it comes to screenshot comparison tools, there’s always room for improvement…
As I’ve mentioned earlier, screenshot comparison is vital for effective UI testing — but does this mean that screenshot comparison is enough? To give an informed answer to this question, let’s once again look at the typical changes that web pages undergo throughout their life cycle:
- The entire page, or a portion of it, will often shift by just a few pixels of whitespace. There will be no detectable difference to a human eye, yet a 100% difference in pixels.
- Most pages have dynamic content that should be excluded from comparison. Dates, usernames and third-party ads are well known examples.
- The UI will change very often. A single change such as a new logo in the header will affect all new screenshots different. To handle this issue, a UI regression testing tool needs to look at the site/app as a whole, not just at individual pages.
- Comparing text through rendered pixels is unreliable due to anti-aliasing.
Sure, the screenshot comparison tools on our list address things like anti-aliasing and rendering artifacts. Blink-diff’s perceptual comparison is another example of how image comparison tools tackle the some of typical challenges of UI testing.
The problem is very few teams have the man-hours to address all of these issue with hand-written tests. So wouldn’t it be nice if a visual testing tool could minimize this overhead?
As a matter of fact, there are visual testing platforms that offer a smarter way for handling the everyday challenges of UI testing. Actually, I am working with a team that’s building an integrated visual testing platform of this kind. Let’s see what it can offer.
UI testing with Screenster: moving beyond image comparison
Screenster is an intelligent cloud-based platform that you can characterise as screenshot comparison 2.0.0.
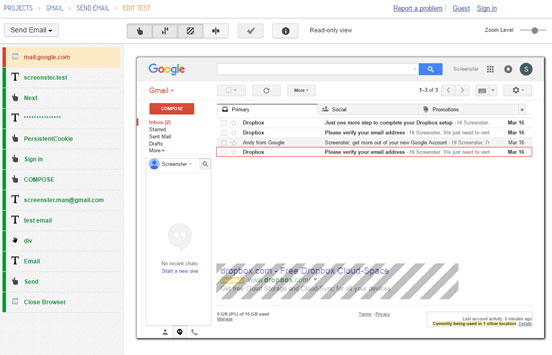
Instead of merely capturing and contrasting screenshots, it generates visual baselines of the UI complete with DOM snapshots and lists of parents for every element. Instead of making you hand-code tests or tinker with auto-generated scripts, it records UX sessions and stores them as series of editable test steps. Instead of taking days to automate a UI test suit, it takes hours.
Below, you’ll find a glimpse of the smart functionality offered by Screenster.
Simple handling of dynamic UI regions
Hand-coding your way around an ever-changing piece of a UI screenshot isn’t exactly a streamlined process. Besides, dealing with page coordinates is a real headache when you test complex responsive layouts.
With Screenster, excluding a dynamic UI region from future comparison is as simple as a couple of mouse clicks. What’s more, the platform will detect about 99% of dynamic content automatically during the first test run.
Automatic handling of timeouts
Timeouts are frustrating, and they contribute to the fragility of UI tests. Instead of making you deal with timeouts, Screenster will automatically determine the optimal waiting time for every test step. Yet again, a process that used to be tedious will no longer bother you.
Test creation in under 3 minutes, no coding involved
The general philosophy with tools like Screenster is that your UI testing tool mustn’t slow you down. To get a glimpse of what you can expect from Screenster, check out the video below. In this clip, you’ll see that a basic test for an Ajax-heavy web application with rich UI can be recorded in under 3 minutes.
Readymade cloud infrastructure with zero overhead
Okay, so how long does it actually take you to set up an automated screenshot tool? When working with Screenster, you deal with a readymade cloud solution. Sure, you’ll need to install a server, but you won’t have to tinker with dozens of separate modules and dependencies. One of the few things that comes as a separate plugin is the solution for CI support.
Sounds convincing? Give it a try!
One more thing. In contrast to using one of the 13 tools mentioned in this post, Screenster doesn’t enforce the need of learning to code. Your manual QAs and business team can master the platform on the go — it’s really this simple. Doesn’t this sound like something you should definitely try?