Selenium locators best practices
September 27, 2018
Table of Contents
The skill of building robust Selenium locators is both science and art. This skill stems from a special kind of intuition that you can only attain while working on real-life projects. Most QAs agree it takes months, sometimes years, to develop this intuition.
So what is the big deal with locators in Selenium? Why do they have to be such a pain point?
Building locators that last is easy if you’re dealing with elements that have unique IDs. Things are still fairly straightforward if you can add missing IDs every time you need them. But is this a realistic expectation in real-life projects? Sadly, no.
In real life, we always stumble across hard-to-reach stuff. Dynamically generated IDs, duplicate IDs, missing IDs, renamed IDs, pieces of legacy code, you name it. More often than not, you don’t get the luxury of asking a developer to assign an ID to each element you target. In situations of this sort, the efficiency of test automation will depend on your knowledge of Selenium locators and best practices related to them.
Let’s have a quick look at the widespread tactics for building locators in Selenium. We’ll begin with a brief overview of locator types. Once we’re through with these, this post will proceed to exploring the advantages, as well as the pitfalls associated with the use of Selenium locators.
Simple locators in Selenium
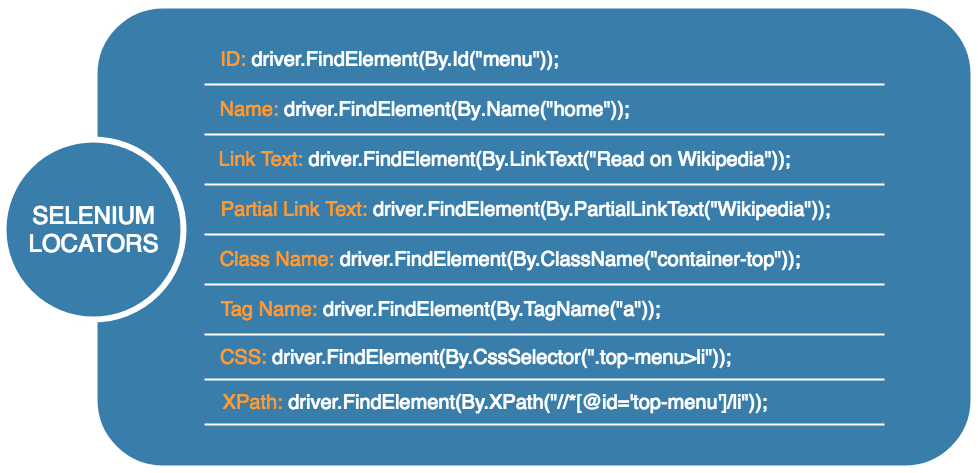
Locators in Selenium typically use CSS or XPath selectors to target on-page elements. In addition, the Selenium API offers a slew of convenience methods that prove handy for simple cases. The latter include targeting UI elements directly by their HTML tags and attributes like id, class, name, etc. Below, you will find several widespread Selenium locator tactics based on the use of these convenience methods.
Identifier (ID) locators
Static unique ID attributes are the most straightforward and future-proof way to target HTML elements. For this reason, it’s always preferable to ask your developers to add IDs to key elements like menus, buttons, content sections, etc. Even if you’ll end up targeting their descendants, working with parent-child locators in Selenium is much easier if the parent has a unique ID.
As far as simple ID-based locators go, here’s what a typical example looks like code-wise:
Static ID-based Selenium locators are short, simple, and independent from page structure. They don’t break if you add or remove ancestors, descendants or siblings to the element you’re targeting.
The only two ways to mess up an ID-based Selenium locator is to rename the ID or have duplicate IDs on the same page. It goes without saying that dynamic IDs that change with every page load don’t work the same way as static IDs.
Name locators
Name attributes prove handy when working with forms. Take a look at this example of a name-based locator in Selenium:
Like IDs, name-based Selenium locators don’t depend on page structure. This means the locators for firstName and lastName won’t break if you relocate the UI elements they target.
On the downside, name attribute values don’t have to be unique. It is not uncommon, for instance, for all radio buttons in a form to share the same name:
In the example above, the gender variable will store the first element with the name gender. Obviously, placing another element above the one your locator is targeting will make that locator target a different element. As a consequence, the gender variable will store the wrong value, and it will pass this wrong value down the line. In some cases, issues of this sort are difficult to trace.
Link text and partial link text locators
Link text locators in Selenium provide a working solution for test cases that cover navigation flows. Check out this example of a Selenium locator that targets the link text of a navigation menu:
In case you’re not sure about the exact wording of your anchor text, Partial Link Text is an option:
The example above illustrates a typical case. When building a menu for a website, developers can’t be 100% sure about the anchor text. For instance, they may start with “Contact” and rename it to “Contact us” at a later point. In cases like this one, Selenium locators that target partial link text can help you minimize the risk of needing to rewrite your test.
Obviously, link text locators in Selenium only work with links that have anchor text, and they will break if you completely rewrite that text. In addition, locators of this type are of little use if you have two or more links with duplicate anchor text.
Tag name locators
Targeting UI elements by their HTML rarely results in a robust UI test. Still, doing this might be viable if you’re working with less common HTML tags. In other words, using tag names as the basis for Selenium locators will work if you’re 100% sure your page contains one and only one element with a given tag. A good example of when a tactic of this sort might work is a tag name locator that targets a <select> element:
Just like other other simple locators in Selenium, this one will target the first and uppermost HTML element with the <select> tag. Should someone place a different element of the same type above this one, your code will inevitably break.
Class name locators
Class names are more specific than tag names yet less specific than name attributes. The Selenium locator in the example below will target the first (uppermost) menu item with the specified class name and ignore the remaining ones:
Knowing that the same class name can be shared by dozens of elements on a single page, using class names for simple locators makes little sense. This said, targeting the class attribute is a lot more common in more complex Selenium locators that target multiple elements by their relations (e.g. ancestors, descendants, siblings). Locators of this sort revolve around CSS and XPath selectors.
CSS and XPath selectors
Non-unique targeting criteria like class names, tag names, name attributes and link text offer little precision or predictability. Whenever you use anything except unique IDs, you can’t be sure that your locator will always target what you think it targets.
To make Selenium locators more precise, you’d want to specify the relations with the elements on the same page using CSS and Xpath selectors. Let’s begin with the former.
CSS selectors
There are over 30 CSS selectors that front-end developers use when styling web pages. Given that CSS locators in Selenium use the same syntax, getting familiar with the most widely-used selectors will definitely boost your QA automation skills.
In the example below, the CSS locator targets the first li item in the same navigation menu:
The advantage of this Selenium locator over capturing the nav__item class value is that it uses a unique ID. Should anyone add another element with the nav__item class above the menu, the test won’t break. Adding another first element inside of the menu, on the other hand, will break the test.
XPath selectors
When it comes to working with parent-child structures, XPath offers a powerful alternative to CSS locators. This type of Selenium locators lets you access UI elements using absolute and relative paths to them. Here’s how you can use absolute and relative XPath when targeting the first navigation menu item from the example above:
Absolute XPath:
Relative XPath:
Comparing the two, relative XPath is shorter and more specific, which makes it less brittle. Should anyone add a parent element to the <ul>, the absolute selector will cease to function. A relative one will still work.
Accessing element via DOM
Yet another way to access HTML elements is via the Document Object Model, the JavaScript representation of page structure. Targeting the same first item in the navigation menu from the example above may look like this in DOM:
The .getElementsByClassName() method from the example above creates a collection of all elements with the nav__item class. After that, you need to specify what item of the list you’re targeting. In our case, it’s the first item of the navItems list.
It’s easy to see that this locator shares the main weakness of class-based Selenium locators. Should anyone make another item the first one, your text will cease to work as expected.
Selenium locators best practices
Knowing about locators in Selenium is one thing, but knowing how to use them is quite another. Being able to build a robust locator begins with understanding of what a robust locator is. Here are three criteria to keep in mind:
- Robust locators are as simple and small as possible. The more elements a locator contains, the higher the chances it’ll break because of the change in the page structure.
- Robust locators still work after you change the properties of a UI element. Relying on frequently-changed attributes like modifier classes (
menu__item--red) is never a good practice. - Robust locators still work after you change the UI elements around the element you target. Whenever you use a non-unique attribute, chances are the locator will break because someone added an element with that same attribute above.
So how do you build reliable locators? Here are several best practices to keep in mind:
Preferred selector order : id > name > css > xpath
IDs are unique, which makes them perfect candidates for robust Selenium locators. Names don’t have to be unique, yet they often are. In any case, duplicate name attributes are less common than duplicate classes. When IDs and unique name attributes aren’t available, though, you’d have to go with more brittle, structure-dependent locators.
Target the nearest ancestor with an ID
If the element you’re targeting doesn’t have a unique ID, chances are its parent or close ancestor has it. If that’s your case, using a CSS selector that includes that element is a good practice, as long as your locator remains fairly short. If you’re targeting a close descendant with a unique ID, XPath should do the job.
When working with dynamic IDs, target the stable part
Static IDs are great, but what if you’re working with a framework that relies on autogenerated IDs? If the dynamic ID has a static part, there’s still hope:
The XPath selector from this example looks for an ul with an id attribute value that contains the word “navigation”.
How Screenster deals with selectors
No matter how great your Selenium selector is, it is always at risk of breaking because of a new change introduced to the UI. So how do you build selectors that can withstand UI changes?
One way to do this is to write a failover algorithm for the cases when the stored selector gets broken. This nifty algorithm would have to find all possible substitutes for the missing id or class, and then select the best match. It is NOT a simple matter!
The use of a failover algorithm is one of the key features of our very own product Screenster. When scanning a UI, Screenster builds a list of all possible locator criteria for each element. Basically, it generates several selectors to make sure the test won’t break after someone has renamed some ID or class, or moved an element outside of its parent div.
Let’s see how it works with the following example:
Using a Class Name locator in this example is an option, but the locator will break should anyone add another “article” element above this one. The obvious alternative of a parent-child locator would be just as fragile.
Instead of relying on a single class or parent-child pair, Screenster will automatically generate a list of all selectors for the element. This list includes the tag name and both classes of the targeted element, as well as the tag names and classes of its ancestors and descendants. Should one of the locators get broken, the platform will use a different one:
The platform builds a tree of DOM ancestors and descendants for each element, and updates these trees whenever someone changes the UI. Basically, it handles all the locator-related work automatically. It certainly saves you a ton of time.
The great thing about this approach is that it can handle cases that involve broken or dynamic IDs:
WebElement navItemHome = driver.findElement(By.cssSelector(“#header .navigation li:first-child“));
The example above illustrates a complex case. There are two elements with identical class names and link texts, so you need something unique to create robust locator for the first one. The ID of its ancestor (“header”) seems like a viable option. But what if something happens with that ID? With Screenster, this scenario is not a problem.
Should anyone rename or delete the ID, the platform will simply build a new locator. It’ll use the non-duplicate header__nav class name of the li’s parent ul. It’s that simple.
As you see, selectors don’t have to be complicated. In fact, you might even forget about the existence of selectors when using a testing automation platform like Screenster.
Care to learn more?
There’s a bunch of other useful functionality, in addition to handling Selenium locators for you. Here’s a short list of features that help us streamline UI testing:
- Verification of all UI elements. Mose tools require explicit assertions (via code or clicks), which limits the scope of UI tests. Screenster verifies all on-page elements for each step. This way the platform will detect bugs in all elements, even if your test doesn’t target them explicitly.
- Intelligent visual testing. When running visual comparison, Screenster zooms in on individual UI elements. It performs pixel-perfect comparison and DOM comparison for each element. With this approach, UI tests are more precise, and have fewer false positives compared to pixel matching.
- Codeless test editing. Editing auto-generated WebDriver code is unproductive, which is why Screenster keeps test editing codeless.
- Web-based UI testing. Screenster doesn’t require a desktop app. Unlike other mainstream cloud tools, we don’t use plugins. Instead, all functionality is available in the format of a web application running on a cloud or local server.
- Compatibility with custom Selenium code and JavaScript. Screester offers full support of Selenium and JavaScript for custom-written tests and test steps. This feature allows our users to extend recorded tests or run their existing Selenium and JavaScript tests in Screenster.
- Automatic waits. Would you tinker with explicit and implicit waits if you didn’t have to? Screenster automatically determines optimal waiting time for each element, turning timeouts into a non-issue.
- Smart handling of dynamic regions. Screenster can detect ads, timestamps, gifs, and other dynamic elements and enables you to manage them with two mouse clicks.
If the idea of codeless, easy-to-create and robust UI tests sounds exciting, there’s an easy way to find out if Screenster can live up to your expectations. Hit the orange button below this post and try the free version of Screenster online. Try it with your website or web app, and you’ll see that UI testing can be fun. Also, we’d love to hear your feedback!